Connecting Sony headphones to your laptop can enhance your audio experience. Whether for music, movies, or gaming, a good connection is key.
This guide will help you easily connect your Sony headphones to your laptop. Many users find it challenging to link their devices, leading to frustration. Thankfully, the process is usually straightforward. Sony headphones often support Bluetooth and wired connections, making them versatile for different laptops.
Understanding the steps to connect them ensures you can enjoy high-quality sound without hassle. This guide will walk you through each method, so you can start listening to your favorite sounds in no time. Let’s dive into the simple steps for connecting your Sony headphones!

Introduction To Sony Headphones And Laptop Connectivity
Many people love wireless headphones. They offer freedom and comfort. Sony headphones are very popular. They connect easily to laptops.
Connecting Sony headphones to a laptop has many benefits.
- Enjoy high-quality sound.
- No wires means less clutter.
- Easy to move around while listening.
- Perfect for music, movies, and gaming.
- Long battery life for all-day use.

Essential Compatibility Checks
Check if your laptop supports Bluetooth. Most laptops do. Look for the Bluetooth icon in the system tray.
Next, ensure your Sony headphones support the right Bluetooth profiles. Common profiles include A2DP and HSP. A2DP is for audio streaming. HSP is for voice calls.
| Bluetooth Profile | Use |
|---|---|
| A2DP | Audio Streaming |
| HSP | Voice Calls |
| AVRCP | Remote Control |
Check your laptop’s operating system. Most modern systems work well. Windows 10 and 11 are good options. MacOS also supports Bluetooth.
Update your system if it is outdated. This can help with connection issues.
Initial Setup Process
First, charge your Sony headphones. Use the USB cable that comes with them. Plug one end into the headphones and the other into a power source. Wait until the light shows that they are fully charged.
Next, enable pairing mode on your headphones. Press and hold the power button until you see a blinking light. This means the headphones are ready to connect.
Now, check your laptop’s Bluetooth settings. Click on the Bluetooth icon and select “Add a device.” Your laptop will search for available devices. Choose your Sony headphones from the list.
Once selected, they will connect automatically. You should hear a sound confirming the connection. Now, enjoy your music or calls wirelessly.
Pairing Your Sony Headphones With A Windows Laptop
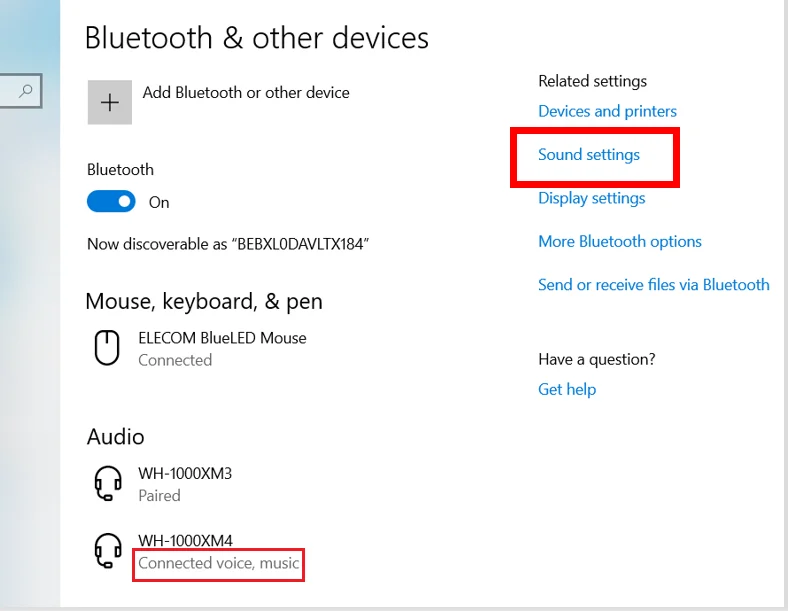
First, go to your laptop’s settings. Look for Bluetooth options. Click on Devices. You will see Bluetooth & other devices. Turn on Bluetooth if it is off.
Next, take your Sony headphones. Make sure they are in pairing mode. This usually means pressing and holding the power button until you see a blinking light. Your headphones should now be ready to connect.
Back on your laptop, click on Add Bluetooth or other device. Choose the Bluetooth option. Your laptop will start searching for devices.
After a moment, your Sony headphones should appear on the list. Click on them to connect. A message will show when the pairing is complete. Now you can enjoy your music!
Connecting To A Mac Laptop
To connect Sony headphones to a Mac laptop, start by clicking the Apple logo. This is at the top left corner. Then, select System Preferences from the drop-down menu.
Next, find and click on Bluetooth. This will open the Bluetooth settings. Make sure Bluetooth is turned on. Your headphones need to be in Bluetooth Discovery Mode.
To do this, turn on your headphones and press the pairing button. Your headphones should appear on the list of devices.
Click on your headphones’ name to connect. Once connected, you can enjoy your music.
Troubleshooting Common Issues
Pairing failures can happen. First, check if your headphones are in pairing mode. Turn off other Bluetooth devices nearby. This helps avoid confusion.
For audio quality adjustments, check the sound settings on your laptop. Make sure the right device is selected. Adjust the volume levels to improve sound. Sometimes, changing the audio format helps too.
Managing multiple connections can be tricky. Disconnect other devices that are not in use. This allows your headphones to connect easily. Always check the Bluetooth settings to see which device is active.
Maximizing Your Audio Experience
Customize your sound settings for better audio quality. Access the audio settings on your laptop. Adjust the equalizer to fit your taste. Test different presets for the best sound.
Check for software updates to boost headphone performance. Open the settings menu on your laptop. Look for updates under the software section. Install any available updates. This can improve sound quality and fix issues.
Make sure to restart your laptop after updates. This helps apply all changes. Enjoy your favorite music with clear sound and rich bass.

Maintaining Your Connection
To save battery life on your Sony headphones, follow these tips. Turn off your headphones when not in use. This simple step helps conserve power.
Use the power-saving mode if available. This feature can extend battery life. Check the manual to find how to enable it.
Reconnect your headphones automatically after turning them on. Many Sony headphones remember the last device. Just turn on your headphones near your laptop.
Make sure Bluetooth is enabled on your laptop. This allows your headphones to connect easily.
Keep your headphones and laptop updated. New updates can improve performance and battery life.
Conclusion: Seamless Integration For Optimal Use
Connecting Sony headphones to a laptop is easy. First, turn on your headphones. Make sure they are in pairing mode. Check the Bluetooth settings on your laptop. Find your headphones in the list. Click to connect. Wait for a few seconds.
Once connected, you can enjoy your music. Adjust the volume using your laptop or headphones. Explore settings for sound quality. Use any special features your headphones offer.
Always check if your headphones are charged. This helps keep them working well. For better sound, update your laptop’s audio drivers.
Frequently Asked Questions
How Do I Connect Sony Headphones To My Laptop?
To connect Sony headphones to your laptop, start by turning on the headphones. Enable Bluetooth on your laptop, then search for devices. Select your Sony headphones from the list and click “Connect. ” Once paired, you can enjoy audio wirelessly.
Why Won’t My Sony Headphones Connect To My Laptop?
If your Sony headphones won’t connect, ensure they are charged and in pairing mode. Check that Bluetooth is enabled on your laptop. Restart both devices if needed. Additionally, remove any previous connections that may cause interference and try again.
Can I Use Sony Headphones With A Wired Connection?
Yes, you can use Sony headphones with a wired connection. Simply plug the headphone jack into your laptop’s audio port. This method provides a stable connection and eliminates battery concerns. Just ensure your laptop recognizes the wired headphones for optimal sound.
Do I Need Drivers For Sony Headphones On My Laptop?
Typically, you don’t need additional drivers for Sony headphones. Most laptops automatically recognize Bluetooth audio devices. However, if you experience issues, check the manufacturer’s website for updated drivers or software. This can enhance compatibility and performance.
Conclusion
Connecting your Sony headphones to a laptop is simple and quick. Follow the steps outlined in this guide for a smooth setup. Ensure your headphones are charged and in pairing mode. Check your laptop’s Bluetooth settings for a successful connection.
Enjoy clear sound and comfort while you work or relax. Troubleshooting tips can help if problems arise. With these easy instructions, you can enhance your audio experience. Enjoy your favorite music and movies with your Sony headphones today. Happy listening!


